


Easy tricks that make Surface Modeling easier
Surfacing is well known for being one of the more difficult functions in SOLIDWORKS. Of all of the CSWP-A exams available, the Advanced Surfacing exam is the one that is likely to require the most effort and multiple tries to pass (at least in my circle of colleagues). It’s true that surface modeling in SOLIDWORKS takes more time and patience to learn than solid modeling, but it’s important to remember that they are not very different. They are still parametric, and the surfacing tab is just another set of tools. Whether you’re just getting started with surfacing tools, or you’ve already ventured into surfacing and are looking for some ways to improve, here are some surfacing tips and features that are easy to learn and simple to use, but can add a lot to your SOLIDWORKS tool belt.

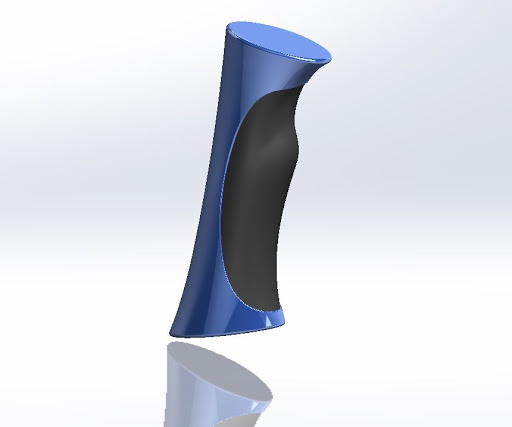
For these tips, we’ll use this ski pole as an example. You’ll be able to see step-by-step how we used these surface modeling tips to perfect the surfacing on the ski pole.
Use Sketch Picture to Guide your Sketches

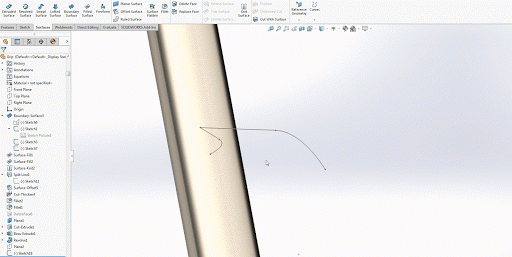
Sketching a spline over an image.
Instead of blindly freehanding your spline sketch, try inserting an image that has similar geometry to what you want to create, and tracing over it with a sketch tool. The pictured example is using the spline tool. You can insert an image by going to Tools > Sketch Tools > Sketch Picture. You’ll be given some options for adjusting the scale and opacity of the image. Try adjusting the position and scale of the image by using the “scale line” that appears after inserting the image, or by adding construction geometry. Then, with the imported image as a guide, you can easily use the sketch tools to create surface geometry.

Turn on “Display Control Polygons” when working with splines

Using Control Polygons to adjust the curve of a spline.
After you have your spline sketch, you’ll need to make adjustments so the curves of your part are exactly how you want them. Dragging the spline point or the arrow tool can be awkward and only gives you limited control. Instead, right-click the spline and select Display Control Polygon, and a sequence of draggable control nodes will appear. These control nodes give you more precise control than dragging the spline points and arrows as they localize the area of change. This creates more gradual and smoother changes in the curves of the spline. You can make the Display Control Polygons function a default setting by going to System Options > Sketch, and then selecting “Show Spline Control Polygon by Default”.
Use Surface Offset to Copy Surfaces

Using the Offset Surface tool.
Copying a surface is a very important element of surface modeling in SOLIDWORKS. You might need to use a copied surface to trim or cut other geometry, or to adjust the shape of the surface for a 3D sketch without changing the original surface. There is no specified “copy surface” tool. So, to copy a surface, simply use the Offset Surface tool and set the offset distance dimension to zero. You will then be left with an exact copy of the surface to use for your next feature. In this case, I created a Split Line to create the surface I wanted to copy, which will be used in the next tip.
Use Thicken Cut to add Indented and Grip-like Geometry

Using Thickened Cut to cut into the solid body in a way that follows the surface’s form.
There are other ways to make indented grip features on your part that involve lots of labor-intensive surfacing (extruding surface edges, trimming, adding boundary surfaces, knitting, etc.) but using Copy Surface and Thickened Cut is an easy two-step process. In the model shown above, the surfaces have been knitted into a solid body earlier in the design tree, and I’ve copied a surface in the shape of the grip feature that I want to add. To use the Thickened Cut tool, I’ll select the copied surface, select the tool, then choose the depth of the cut. The solid body is left with an indented cut that only took a few minutes to create. You can touch up the appearance by adding some fillets to the edges of the cut and changing the color and texture of the grip surface.
Finished Thickened Cut with fillets and a rubber appearance added.
Project Curve
Using the Project Curve tool.
The Project Curve tool is another great feature that simplifies surfacing in SOLIDWORKS. The Project Curve tool essentially creates a 3D sketch in the form of a curve by using two 2D sketches as a reference. In the GIF above there are two fully defined 2D sketches on the front and right planes. One sketch represents the shape of the curve in the Y and Z directions, and the other sketch represents the curve in the X and Z directions. Project Curve combines these two sketches to create a spline in 3D space instead of on a single plane. You can adjust the curve by adjusting the parent sketches. This is much easier than creating a spline within a 3D sketch and takes the guesswork out of dimensioning, positioning, and adjusting a 3D spline. With other geometry or another curve, you can then create boundary surfaces and loft surfaces. This tool is commonly used for 3D modeling parts with complex surface shapes such as car doors. I recommend playing around with creating projected curves and then using them together to create surface geometry.

End result of the Projected Curves.
Hopefully, these 5 tips will help you improve your surfacing skills and become a better SOLIDWORKS user in general. If they seem challenging at first, don’t give up and keep practicing. Eventually, you will feel no difference in difficulty between solid and surface modeling.
Check out our courses on Surface Modeling to practice your advanced skills:


