


If you’ve ever seen a model of a small electronic train chugging along a little metal track lined with cotton-ball bushes and a painted foam mountain, you’ve seen how important scale is. In the case of a model train and its surrounding terrain, scale is important because the model visually represents an accurate depiction of what a real-life train and its surroundings would look like. Without considering scale in each of the components, the model is confusing and inaccurate.
Similarly, the idea of scaling external references, blocks, text, and the plotted drawing itself in AutoCAD is important because it impacts how things are installed and built to code in the field. If your drawings aren’t scaled properly, miscommunication and other unfavorable results occur. It’s crucial to accurately scale your drawings, especially since many of the components and systems need to go into an actual building.
Here is how you can use just some of the various AutoCAD scale commands and tools to make sure your drawings are properly communicating the visual aspects of the design.
How to Change Scale in AutoCAD using the Scale Command
Objects in your drawing, such as drawn lines, 3D extrusions, and more can be scaled by factors by using the SCALE command in AutoCAD itself. The objects currently in the drawing below are set at a scale of 1. However, you can change scale in AutoCAD by using the AutoCAD scale factor. This will show you how to change scale in AutoCAD without changing the dimension.
- How to scale down in AutoCAD – Window select the object(s) in AutoCAD, type SCALE, and then specify a number between 0 and 1. Hit Enter. The size of the object(s) will SCALE DOWN by that factor.
- How to scale up in AutoCAD – Window select the object(s), type SCALE, and then specify a number larger than 1. Hit Enter. The size of the object(s) will SCALE UP by that scale factor. Refer to Figure 1 to see the differences in scale factors.
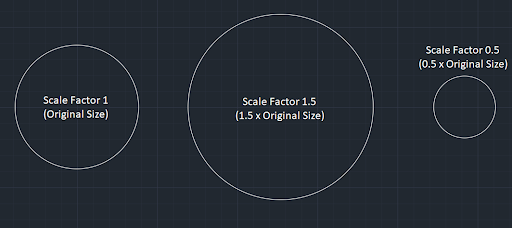
Figure 1: AutoCAD Scale Command
How to Scale with Reference in AutoCAD
Many times, PDFs, images, and other drawing files are provided to CAD designers as something to draw on top of or use as a basis for design in AutoCAD. Through the XREF window, you may attach these items at whatever scale you choose. But what if a floor plan on an image background says that the distance between two columns is 3 ft., but it doesn’t appear to be true to dimension size once it’s inserted in your drawing? You can use the ALIGN command to confirm dimensions on what is inserted as an external reference. See Figure 2 to see what this looks like with the steps below. Knowing how to scale an image in AutoCAD, scale a pdf in AutoCAD, and scale drawings in AutoCAD will impact how successful your model will be.
- Look for an AutoCAD Scale reference dimension, such as a given dimension on the plans. If none exist, you could assume that an external door is 3 ft. The key here is to find a few dimensions between crucial points on a drawing. Dimensions between columns work great for this. If there is nothing you can snap to, temporarily draw lines for reference.
- Next, draw a line that matches what external reference dimension you’re trying to check. If 3 ft. is the dimension you’re checking, draw a line in AutoCAD model space at 3 ft. In the case of Figure 2, I’m inferring that the external door of an external reference is 3 ft., so I’m checking to see that it is indeed 3ft.
- Then, select the ALIGN command and pick the first point of where you are referencing to on the plans to the first point of the drawn 3 ft. line. Be sure to also match up the last point of reference on the plan to the last point of the drawn 3 ft. line. The takeaway here is to match up starting points and ending points.
- Hit Enter and watch the image, PDF, or CAD drawing scale up or down to match your drawn line.
- Repeat these steps to confirm with a different dimension. Sometimes dimensions may say they’re one thing visually, but they might have been overwritten or somehow inaccurate. It never hurts to verify.
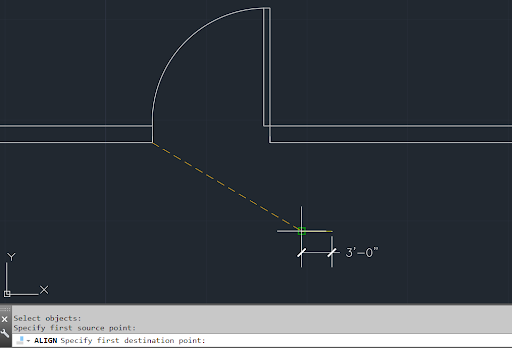
Figure 2: AutoCAD Align Command
How to Scale Blocks in AutoCAD
In the case of firms that may be using a lot of blocks in AutoCAD, there are ways to provide the variation of appearance with scale. Here is how you can insert blocks at different scales.
- Type INSERT to get to a prompt where you can insert a block. Within that prompt, you have options for insertion, scale, and rotation. For blocks that are made to not scale uniformly, you’re able to specify the scale of the X, Y, and Z aspects of the block. See Figure 3.
- For this exercise, specify the X scale as 3 and leave Y and Z at 1. Notice that it makes the X-axis of the circle into more of an oval shape. See Figure 4.
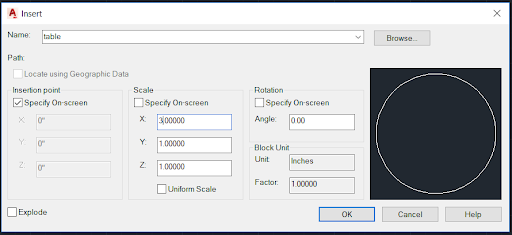
Figure 3: Insert Block in AutoCAD
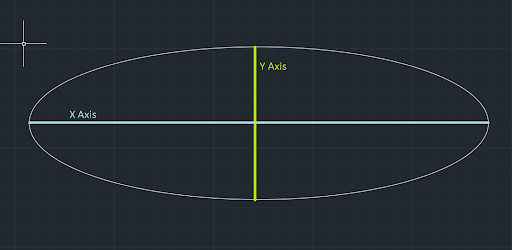
Figure 4: Block in AutoCAD
How to Scale Text and Dimensions in AutoCAD
It’s important that your drawing has text that is readable, no matter what scale you are plotting to. This is where annotation becomes important. Prior to the annotative scale in AutoCAD, making your text appear the same at any given drawing scale was a challenge. You had to have multiple copies of the text at different sizes (AutoCAD scale factor) and on different layers that were only turned on when you were trying to view things at a certain drawing scale in a viewport. Since the AutoCAD annotative scale concept was introduced in AutoCAD 2008, there have also been some issues. For example, when there was a disconnect between drawing scale (discussed in the next section) and the annotation object scale that would make it so text would show up at in some instances but not others. Today, it’s much easier because you can set text and dimensions as “annotative” in the Properties Palette. This means it’ll automatically adjust to the scale you’re working with, so it appears to be the same size no matter what scale you’re at in paper space or model space. This feature, which is already available within AutoCAD, eliminates the steps of having to copy multiple sizes of text and setting them at different sizes. See Figure 5.
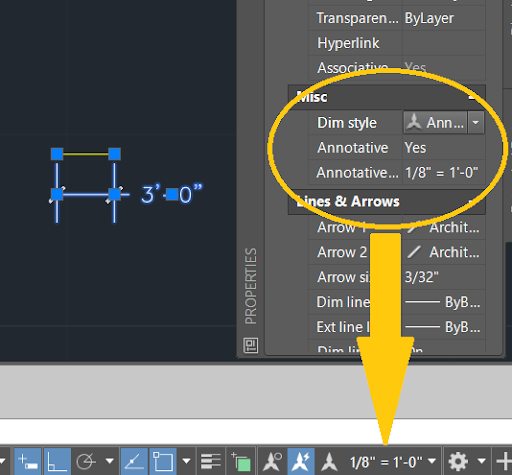
Figure 5: Annotative Scale in AutoCAD
How to Scale a Drawing in AutoCAD
Fitting your drawing onto viewports in paper space is important to get the visual communication across what needs to be built and installed. If your preferred drawing scale in AutoCAD is not available in the list, you can do the following:
- Open up the “Edit Drawing Scales” window by selecting “Custom…” from the list of available scales located in the status bar in the lower part of the AutoCAD interface.
- Add your own custom drawing scales to the list so you can use them in AutoCAD viewport scale and more. See Figure 6.
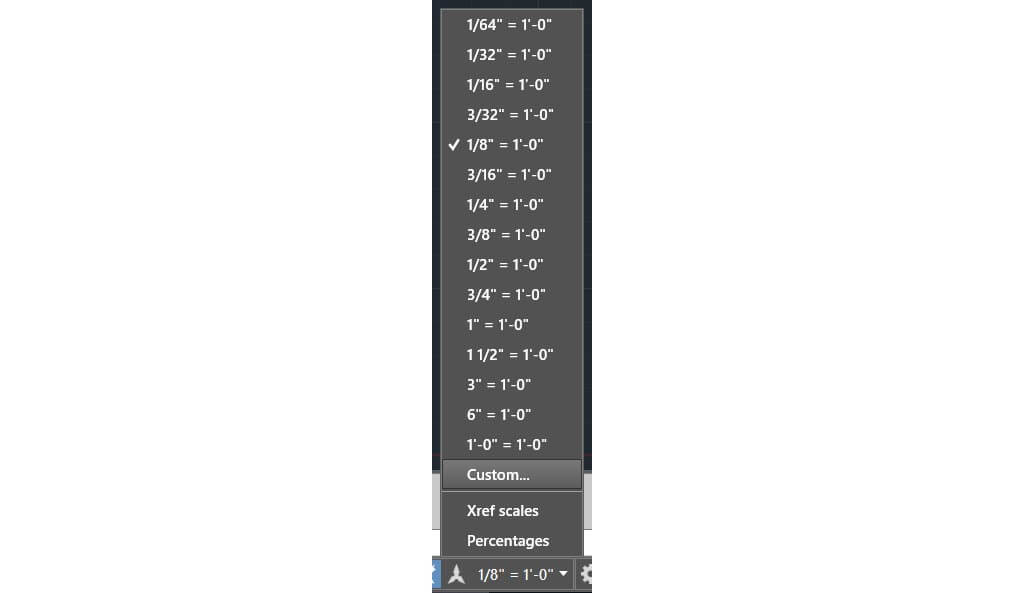
Figure 6: AutoCAD Drawing Scale
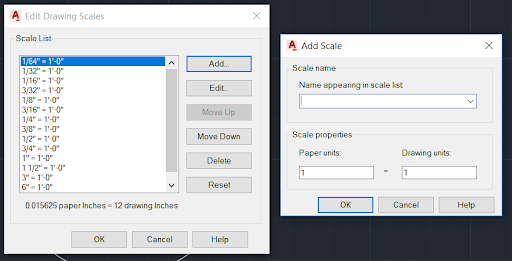
Figure 7: AutoCAD Drawing Scale
How to Plot to Scale in AutoCAD
When you’re drawing in model space, you draw “full size,” but to portray that in a plotted deliverable, you need to specify a plot scale as well. The plot scale lets you specify how to best portray your CAD design, given the paper size you are plotting to. How to set scale in AutoCAD Paper Space and Model Space When using an AutoCAD paper space scale, you are working with two parts: the scale of the overall layout of the drawing based on paper size (usually 1:1), and the viewport scale that shows the model. The relationship between the two is that the viewport scale represents a ratio of the paper size to the size of the model within the viewports. You could also plot from model space and treat the plot scale as the ratio of plotted units to world-size units you used to draw the model. See Figure 8 for an example of the window itself. You’ll want to adjust it to your specific situation.
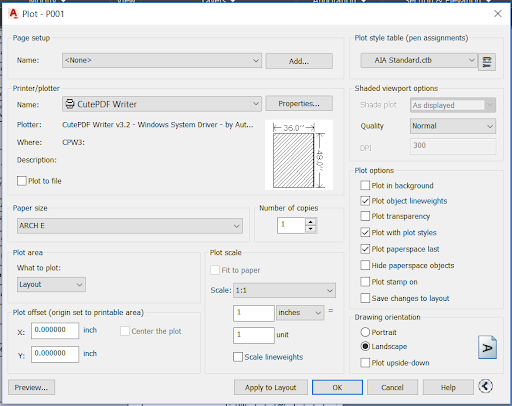
Figure 8: Plotting to Scale in AutoCAD
As you can see, there are many areas where AutoCAD scale can come into play. These are just some of the main features of scale that make the difference in getting your point across when your drawings are viewed in the field. More detail on these features and more is available in the Help menu (F1) in AutoCAD. Want to learn more? Watch our AutoCAD Essentials video tutorials to learn how to set up and design in AutoCAD. Learn how to expertly use viewports, blocks, text and attributes, annotations, drawing templates, title blocks, and more! Go from beginner to certified-ready with tutorials from some of the most popular AutoCAD training courses.


